Bouncing effect in Flash MX 2004
Demonstration
Written by
Jayanthi
This tutorial will teach you how to create a bouncing effect animation using Motion Tween and Shape Tween in Flash MX 2004. The .fla download file is included at the end of the tutorial.
Please note:
1. You need to have Flash Player 7.0 installed to view the Flash animation.
2. Flash MX 2004 must be installed in your system to download the .fla file.
In the demonstration, the bouncing heart animation is created using motion tween and the shadow effect using shape tween.
TO CREATE MOTION TWEEN
Steps to Follow :
Create a Symbol
* First draw an object for Motion Tween.
Like in the above demonstration I used heart.
* Select the object you have drawn and press F8 to convert this object to a Symbol.
* In the Symbol window which appears now. Name this object heart_mc, choose Movie clip behavior and bottom center square for registration. Press OK.
http://www.entheosweb.com/Flash/bouncing_effect.asp
Create a Motion Tween
* Double click on the Layer and type "Heart".
* Select Frame 30 and press F6 to insert a keyframe.
* Select Frame 15 and press F6 to add another keyframe.
* With the playhead still on Frame 15, hold the Shift key to move the heart_mc in a straight line, and drag the heart_mc up.
* Select any frame between Frames 2 and 14 and select Motion from the tween pop-up menu in the Property inspector.
* Select any frame between Frames 16 and 29 and select Motion from the tween pop-up menu in the Property inspector.
* Press Ctrl+S to save your changes.
Create a Shape Tween
* Insert a new Layer and call it "Shadow".
* Select the first frame in the Shadow Layer, draw borderless shadow relevant to your Symbol.
* If your Color Mixture Window is not open, press Shift+F9 to open it.
* Select Eyedropper tool from your Tool box. Click it on your shadow. Now go to Color Mixture Window and type 25% for Alpha value.
http://www.entheosweb.com/Flash/bouncing_effect.asp
* Select Frame 30 and press F6 to insert a keyframe, then select Frame 15 and press F6 to insert a keyframe.
* With the playhead on Frame 15, select the Free Transform tool. Slightly reduce the size of the Shadow.
* With Frame 15 still selected, select the Eyedropper tool in the toolbar, and then click on your shadow object. Now go to Color Mixture Window and change Alpha value to 10%.
* Select any frame between Frames 2 and 14 on the Shadow layer. In the Property inspector, select Shape from the Tween pop-up menu.
* Select any frame between Frames 16 and 29 on the Shadow layer. In the Property inspector, select Shape from the Tween pop-up menu.
Now its time for Final touch up
* Select Frame 1 of the Heart layer. Press F6 to add a keyframe. A new keyframe is added, and the playhead moves to Frame 2.
* Go back to frame 1, select the Free Transform tool from your toolbox.
* Select the transformation center point (the small circle near the center of the movie clip) and drag it to the bottom of the heart. On the Stage, drag the upper middle transform handle down to slightly compress the heart shape.
* Right-click Frame 1 of the heart layer and select Copy Frames from the context menu. Go to 29th frame and press F8 to insert a new keyframe. Right-click 29th frame and choose Paste Frame from the context menu.
* Click on the Stage, away from any objects. Type "28" in the Frame Rate text box of your Property inspector window.
* On the heart layer, select any frame between Frames 2 and 14. Then in the Property inspector, in the Ease text box, type 100. Similarly select any frame between Frames 16 and 29 in the same layer, then go back to Property inspector window and type -100 in the Ease text box. Do the same thing to the Shadow layer.
Press Ctrl+Enter to view your animation.
Download the .fla file
Tuesday, March 27, 2007
Thursday, February 1, 2007
Flash Animation 基本法
a)首先,
keyframe 是modify 那个frame 的主要"东西".如果要modify那个frame,一定要有那个keyframe,
可以在那个frame right click 选择 insert keyfrme 或是 在那个frame press F6
blank keyframe 是和 keyframe 差不多一样的,只是blank keyframe 是那个在 frame 是空白的。可以任由你去发挥
insert frame只是多放一个桢,可是这个frame不能让你edit,就是不能增加或减任何的物件 ,也不能增加任何layer,insert frame只是增加多一个桢,让movie走多一个桢的时间
remove frame顾名思义就是把那个桢删除,减少一个桢的时间
insert scene 是放多一个scene,如果没有action script,第一的scene 走完后,会自动走第二个scene
remove scene,顾名思义,就是要删除这个scene,可是多数是在modify scene才能删除
做好的flash movie 要如何 export ??
1)可以到 control-->test movie 或 shorcut key ctrl+Enter
2)也可以到file---->publish setting 和 publish preview
可是都是建议先save 你的 .fla 文件,才输出,才能够有.swf flash movie
很多网友都有问,要如何把flash file 换成image file如jpeg或gif或save as jpg file,或gif
据我所知,唯一办法就是进入了macromedia flash 的programme 里面,到file-->publish setting 或publish preview export 出来
publish setting是要调你要export什么样的文件.
至于要如何export .exe
就是要从.swf文件下手
先把.swf文件publish,然后在.swf里的file-->create projector,然后save file 就可以了
如果要画一个正方形或圆形,除了用oval tool 和rectangular tool 画后,到info调大小,可以按着 shift 画
如果画了一条直线,要直线弄曲,可以在线旁拉曲,
或要多一个点,按着ctrl,在拉,
如果要复制,可以先select,在ctrl 或 alt拉
如何使flash的背景透明?
如何做Mouse drag
1。把你的图片换成Movie clip,然后打开动作面板输入
onClipEvent(enterFrame) {
this._x = _root._xmouse;
this._y = _root._ymouse;
2. 在场景第一个frame输入
Mouse.hide()
为什么在macromedia flash打不到华语??
試試看在 start->run 輸入intl.cpl,然後在Advanced標簽部分選擇中文
flash 支持那三种音乐档案?
最新版本的格式也只支援WAV, MP3和AIF音樂格式
Wednesday, January 31, 2007
[教学] Flash Masking 2
1)首先,import 图片或是自己画,

2)如果是import的,就把他拉到scene上,

3)然后在timeline,第40个frame 按 F7=add frame, 然后在加多两个layer,

4)把同一张图片,copy , paste in place 记得!!要在layer 2,然后把layer2 的图片放大,transform--

5)在layer 5,画一个小圆圈,这个layer负责masking,然后把这个圆圈group,

6)在layer3的第40个frame,add keyframe,然后把小圆圈拉到图片的另一个端,

7)选择layer3的一个frame,properties--->motion,

8)然后把layer 2 和layer 3 lock起来,

9)然后在layer 3 right click ,选择mask。
就大功告成 !!!记得要test movie看成绩
2)如果是import的,就把他拉到scene上,
3)然后在timeline,第40个frame 按 F7=add frame, 然后在加多两个layer,
4)把同一张图片,copy , paste in place 记得!!要在layer 2,然后把layer2 的图片放大,transform--
5)在layer 5,画一个小圆圈,这个layer负责masking,然后把这个圆圈group,
6)在layer3的第40个frame,add keyframe,然后把小圆圈拉到图片的另一个端,
7)选择layer3的一个frame,properties--->motion,
8)然后把layer 2 和layer 3 lock起来,
9)然后在layer 3 right click ,选择mask。
就大功告成 !!!记得要test movie看成绩
[教学] Flash Masking 1
这个教学是如何做基本的flash masking,
他只是一种好像电筒照到的效果
在这个基础教学只需用到两个layer,
1)首先,在scene 上写上一行字,然后在第40个frame放一个keyframe或是把frame extend 到第40 个frame

2)然后create宁外一个layer,那个layer必须是在那行字的layer上面,这个就负责masking,在layer circle 上,画出一个椭圆形,然后也是在第40个frame 那边extend frame.

3)鼠标选择layer circle 的第一个frame,选择第一个frame的椭圆形,然后把他group 了

4)然后在layer circle的第40个frame create 一个keyframe,然后把椭圆形拉到masking字的右手边,

5)选择layer cirlce,properties-->tweening-->motion


6)然后把拿两个layer lock起来,

7)然后right click layer circle 选择mask

***
**
*
大功告成
他只是一种好像电筒照到的效果
在这个基础教学只需用到两个layer,
1)首先,在scene 上写上一行字,然后在第40个frame放一个keyframe或是把frame extend 到第40 个frame
2)然后create宁外一个layer,那个layer必须是在那行字的layer上面,这个就负责masking,在layer circle 上,画出一个椭圆形,然后也是在第40个frame 那边extend frame.
3)鼠标选择layer circle 的第一个frame,选择第一个frame的椭圆形,然后把他group 了
4)然后在layer circle的第40个frame create 一个keyframe,然后把椭圆形拉到masking字的右手边,
5)选择layer cirlce,properties-->tweening-->motion
6)然后把拿两个layer lock起来,
7)然后right click layer circle 选择mask
***
**
*
大功告成
 Flash: http://www.netcolony.com/yawchoong/cari_flash_masking_tutorial/masking.swf
 scr
scr


Flash Animation 教学
可爱的 Robot仔按钮

在这里想教大家弄一个可爱的 Robot仔按钮。眼睛会 Random 的动。 Mouse Over 时会有表情。
难度:Beginner-Intermediate
(一)
Dimension: 100 x 100 pixels
Background: white
FPS: 48
先画 Robot仔的身体。
(二)
选 Insert -> New Symbol 或 Ctrl+F8
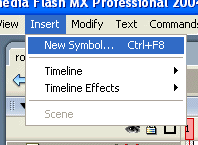
在 Create New Symbol Dialogue Box 里面,打 robot_off。在 Behaviour Type 选 Graphics。按 OK。
这是给 Mouse Off (滑鼠没有在 Button 上面)时的 Robot仔表情。

跟着就会去到 robot_off 的 working environment 里面。在这里贴上 Robot仔的身体。(可以回到 Main scene copy 再 paste Robot仔的身体)。
(三)
现在我们要弄一个会自己转的眼睛。
再 Insert New Symbol,打 robot_eye,behaviour 选 Movie。
现在我们会在 robot_eye 的 working environment里面。
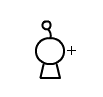
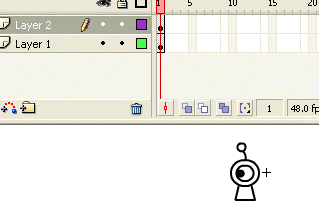
在这里,画一个圆圈。这是眼睛的外线。Rename this layer as "outer"
Insert new layer。Rename as "inner"
在 layer "inner" 里面画一个黑珠子。这是眼黑。先把它画在左边(看左)

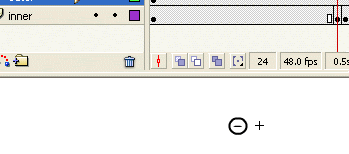
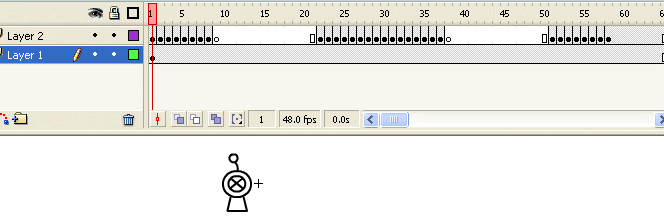
现在我们把两个 Layer 都加 frame 加到 180 个 frame。
在 layer "inner" 的第 24个 frame,我们 Insert Keyframe,在把黑珠子改成一条直线。(眨眼)
在 layer "inner" 的第 24个 frame,我们 Insert Keyframe,再画同样的黑珠子。这次我们把它 Move 到比较右边(看右)。
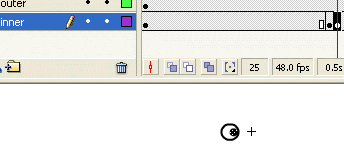
现在 Right Click on frame 24-> Copy Frame。然后 paste 在 frame 49。
在 Frame 50 insert blank keyframe,画眼珠在中间。(看直)
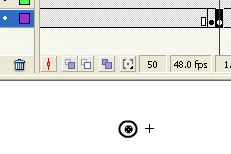
跟着读者可以随便在一个 Frame 里面在加 Keyframe。然后在画眼珠看上,看下,看斜,眨眼 等等。。。
现在再 Create New Layer, Rename as "Action"。
在 Layer "Action" 的最后一个 Frame,也是 Frame 180 ,加入 Actionscript。输入:
gotoAndPlay (random ( 180 ));
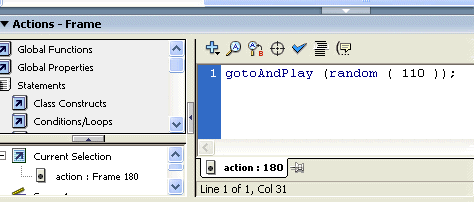
这个 scripts 的功能就是 randomly play any part of the frames。
OK! 现在我们 create 了眼睛。我们回到 Robot_off 的 working environment 里面,然后 drag robot_eye 进去。
这样一来, Robot_off 完成了。
(四)
现在要作 Robot_on 的表情了。
Create new symbol -> type in robot_on
Behaviour: Movie
第一个 Layer 我们 paste 上 robot 的身体。加 frame 到 65。
Create new layer,这时候我们就用 Frame-by-frame 的技术来画 robot 的眼睛会闭着,然后转动。
参考如下:
>>转动的眼睛<<
这样一来,我们就完成 robot_on 了。
(五)
现在我们要作 Robot_down,也就当我们按滑鼠键的时候的表情。
Insert new symbol-> Type in "robot_down"
Behavior : Graphics
在 Robot_down working environment 里面我们画上一个被按的表情。

就大功告成!
(六)
现在开始作 Button。
Insert new symbol-> Type in "robot_button".
Behaviour : Button。
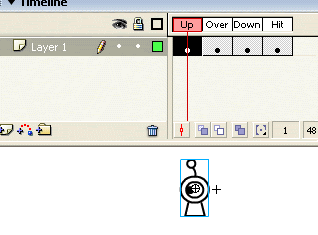
在 Robot_button 的 working environment 的 frame "UP" 里面,放入 Robot_off 的 graphic。
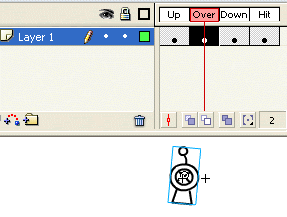
在 Frame "On"(Over) 里面放 Robot_on 的 movie clip。稍微 rotate 一点(+5 degree)。
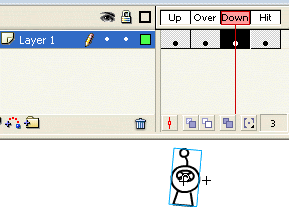
在 Frame "Down" 放 Robot_down 的 graphic。
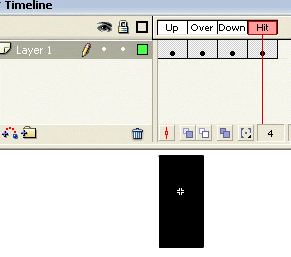
在 Frame "Hit" 将 Robot 的范围涂黑它。。。
(七)
现在回到 main scene,把 Robot_button drag 进来。再写上 "Click me" 的字眼。就大功告成了~!!!
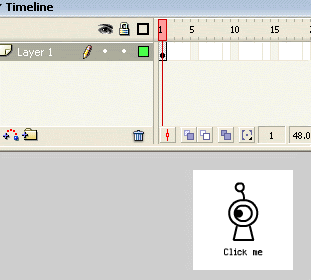
完成品:
>>Robot<<
FLA file:
>>Click here to download<<
在这里想教大家弄一个可爱的 Robot仔按钮。眼睛会 Random 的动。 Mouse Over 时会有表情。
难度:Beginner-Intermediate
(一)
Dimension: 100 x 100 pixels
Background: white
FPS: 48
先画 Robot仔的身体。
(二)
选 Insert -> New Symbol 或 Ctrl+F8
在 Create New Symbol Dialogue Box 里面,打 robot_off。在 Behaviour Type 选 Graphics。按 OK。
这是给 Mouse Off (滑鼠没有在 Button 上面)时的 Robot仔表情。
跟着就会去到 robot_off 的 working environment 里面。在这里贴上 Robot仔的身体。(可以回到 Main scene copy 再 paste Robot仔的身体)。
(三)
现在我们要弄一个会自己转的眼睛。
再 Insert New Symbol,打 robot_eye,behaviour 选 Movie。
现在我们会在 robot_eye 的 working environment里面。
在这里,画一个圆圈。这是眼睛的外线。Rename this layer as "outer"
Insert new layer。Rename as "inner"
在 layer "inner" 里面画一个黑珠子。这是眼黑。先把它画在左边(看左)
现在我们把两个 Layer 都加 frame 加到 180 个 frame。
在 layer "inner" 的第 24个 frame,我们 Insert Keyframe,在把黑珠子改成一条直线。(眨眼)
在 layer "inner" 的第 24个 frame,我们 Insert Keyframe,再画同样的黑珠子。这次我们把它 Move 到比较右边(看右)。
现在 Right Click on frame 24-> Copy Frame。然后 paste 在 frame 49。
在 Frame 50 insert blank keyframe,画眼珠在中间。(看直)
跟着读者可以随便在一个 Frame 里面在加 Keyframe。然后在画眼珠看上,看下,看斜,眨眼 等等。。。
现在再 Create New Layer, Rename as "Action"。
在 Layer "Action" 的最后一个 Frame,也是 Frame 180 ,加入 Actionscript。输入:
gotoAndPlay (random ( 180 ));
这个 scripts 的功能就是 randomly play any part of the frames。
OK! 现在我们 create 了眼睛。我们回到 Robot_off 的 working environment 里面,然后 drag robot_eye 进去。
这样一来, Robot_off 完成了。
(四)
现在要作 Robot_on 的表情了。
Create new symbol -> type in robot_on
Behaviour: Movie
第一个 Layer 我们 paste 上 robot 的身体。加 frame 到 65。
Create new layer,这时候我们就用 Frame-by-frame 的技术来画 robot 的眼睛会闭着,然后转动。
参考如下:
>>转动的眼睛<<
这样一来,我们就完成 robot_on 了。
(五)
现在我们要作 Robot_down,也就当我们按滑鼠键的时候的表情。
Insert new symbol-> Type in "robot_down"
Behavior : Graphics
在 Robot_down working environment 里面我们画上一个被按的表情。
就大功告成!
(六)
现在开始作 Button。
Insert new symbol-> Type in "robot_button".
Behaviour : Button。
在 Robot_button 的 working environment 的 frame "UP" 里面,放入 Robot_off 的 graphic。
在 Frame "On"(Over) 里面放 Robot_on 的 movie clip。稍微 rotate 一点(+5 degree)。
在 Frame "Down" 放 Robot_down 的 graphic。
在 Frame "Hit" 将 Robot 的范围涂黑它。。。
(七)
现在回到 main scene,把 Robot_button drag 进来。再写上 "Click me" 的字眼。就大功告成了~!!!
完成品:
>>Robot<<
FLA file:
>>Click here to download<<
Subscribe to:
Posts (Atom)